Thursday, March 7, 2024

Sculptural basketry techniques program


Our March meeting was led by guild member Jennifer Jay.  Jennifer was awarded a scholarship to attend CNCH 2023 and her choice of class was one led by Polly Giacchina - The enhanced twined form".  After Jennifer had practiced the various techniques she had learned in the class, she challenged herself to share them with guild members.

 Jennifer brought two techniques to the hands-on-class.  Coiled basketry and knotless netting.  She made little kits for everyone in the class with materials suitable for learning the basics of both of these sculptural forms.  In the photo above, you see a vase covered with knotless netting and a little dangling basket using the coiled basketry technique.  Also, in the center of the vase is tree branch, covered with wrapped yarns that mimics the coiled basketry technique.


Most, if not all of our group was pretty new to these basketry ideas.  Jennifer explained how to look for materials that were unusual and combine them in different ways.  The pieces she had on display showed just how broadly the different techniques could be expressed.

We all got down to the nitty gritty of starting our little coiled piece.  Here are a few of our first attempts.


I know that I speak for all of the members who attended this meeting, that we appreciate Jennifer sharing her knowledge with us.  It was a grand way to spend the evening and we all walked away with new tricks in our fiber bag.

Sunday, December 17, 2023

Christmas Party 2023


This year's party was especially welcome since we had to cancel the one last year because of bad weather.  We also changed our gift policy from a raffle basket(s) in which just one, two or three people won a basket full of gifts, to an old fashioned exchange in which everyone who brought a gift, received a gift.

 For this year's gift exchange, the theme was to bring a handmade fiber gift.  You didn't need to have made the gift, as long as it was handmade.  


Anni tries on her new knitted cap, made by ShereƩ.


Paulie's gift was made by Anni.  The wreath was made using spinning roving, so that when you are finished with the holiday season, you still have roving for long hours of spinning pleasure.  


Baxter is new to the gathering and really enjoyed the extra attention and treats.  In the photo below, he is receiving lots of love from Mary - his new best friend!


This was Faye's first RFG party.  Her gift was from Paulie, a handwoven Christmas towel. It will be the first handwoven towel in Faye's kitchen.  I don't think it will be the last one, though.


Felted snowman, made by Shelley, received by Igor

Zip purse made from handwoven and commercial cloth by Mary, received  by Polly.

Shelley received a handwoven towel made by Kathy R.

ShereĆ© showing gift from Lorene to her.  Lorene bought this delightful elf from a vendor next to her at a Christmas sale.

Naturally, this is only a fraction of the handmade gifts.  And, I really should mention the food - a fabulous pot luck enjoyed by all.  Looking forward to next year's gathering already.

Saturday, November 4, 2023

Making Paper Christmas Stars


 At the November meeting, we challenged our inner child and made European Paper Stars using waxed kite paper.  The stars are popular decorations in Germany and many households display them during the whole Christmas season.  

We had three guild mentors who had learned the procedures before the meeting so that they could guide members through the process.

The beauty of these stars is revealed once they are hung on a window and the sun shines through them, showing all the various layers of color in the folded paper.  The intricacies are really amazing.


 Here is an array of stars that the mentors made before the program.  We started with the most basic star and worked our way up to more difficult ones.


 Each star is made up of multiple sub-units.  Some stars used 8 squares of paper, some 10 and more.


  A little dab of glue holds the pieces together.


This is a great activity to do on an afternoon with children or grandchildren.  We learned the technique from Marilyn Romatka on Taproot Video. 

https://taprootvideo.com/preview_class.jsf?iid=1&cid=4


Thursday, June 15, 2023

Dyeing Skeins for Weaving


Reno Fiber Guild members were treated to a dye workshop with Diane S. (former co-owner of the Just Our Yarn Company).  Diane showed us the methods she used when dyeing skeins for her former company.  The skein she is holding up in the photo  at the left isn't her method.  Instead she showed us how to paint a few different colors on each skein in a more random pattern. 

The photo to the right is the array of dyes prepared for us to use.  There were so many choices, it was hard to pick just a few.


These are skeins painted by Anni B.  They were allowed to batch for 48 hours and then Anni rinsed the excess dye out of them and enjoyed the wonderful color display.  Wonder what she will weave with these beauties.


 Diane dyed one skein black for a guild member.  The others are examples for us to follow and then the outside skeins are ones in which she used some of our leftover dye.


 Skeins to the left were dyed by Igor and Beryl.  Looks like brilliant parrot colors, don't they?


The group of dyers had a fabulous time.  There is nothing like dabbling in color to make your heart sing. 


 Kathy W.'s skeins are in the photo below.  What colors - what possibilities!


Sandy R.'s skeins on her drying rack.  Brilliant colors and lots of blue skies!


Jann S. chose some lovely colors for her skeins - turquoise, fuchsia , orange and purple


Suzanne W. has some lovely yarn to work with.  She was especially happy that Diane's techniques reduced the amount of water needed to rinse out the excess dye.
 

Wednesday, April 5, 2023

Turned Beiderwand Threading Weaves a Lot of Structures!

 It turns out that a turned beiderwand threading will give you lots of options.  You can do turned summer and winter and its variations and double weave on your beiderwand warp.  And, you can also change the ratios of pattern to tie downs by changing your tie ups.  Here are a few more photos of some of the variations Karen's students woven in the workshop and also several links that may be of interest to our readers.

https://chgweavers.org/turned-beiderwand-with-karen-donde/ 

https://www.weaversguildmn.org/news/learning-turned-biederwand 

https://karendondehandwovens.com/home.html


Shelley woven this turned extended summer and winter sample on her warp


 This is Suzanne's turned summer & winter.


 Diane's turned summer & winter with a 60/2 silk weft


 Maggie did a double weave sample on her warp.

Wednesday, March 29, 2023

Turned Beiderwand Workshop Photos


 Here is a collection of photos from the Turned Beiderwand Workshop given to Reno Fiber Guild members by Karen Donde.  Each weaver is represented by their first name only to protect their privacy.

Turned Beiderwand Ratio 1:3 woven by Deb


Turned Beiderwand Ratio 1:2 woven by Diane


Turned Beiderwand Ratio 1:2 woven by Joan


Turned Beiderwand Ratio 1:3 woven by Karen

Turned Beiderwand Ratio 1:3 woven by Kathy


Turned Beiderwand Ratio 1:4 Woven by Maggie

More photos in the next post .

Tuesday, March 28, 2023

Turned Beiderwand Workshop with Karen Donde


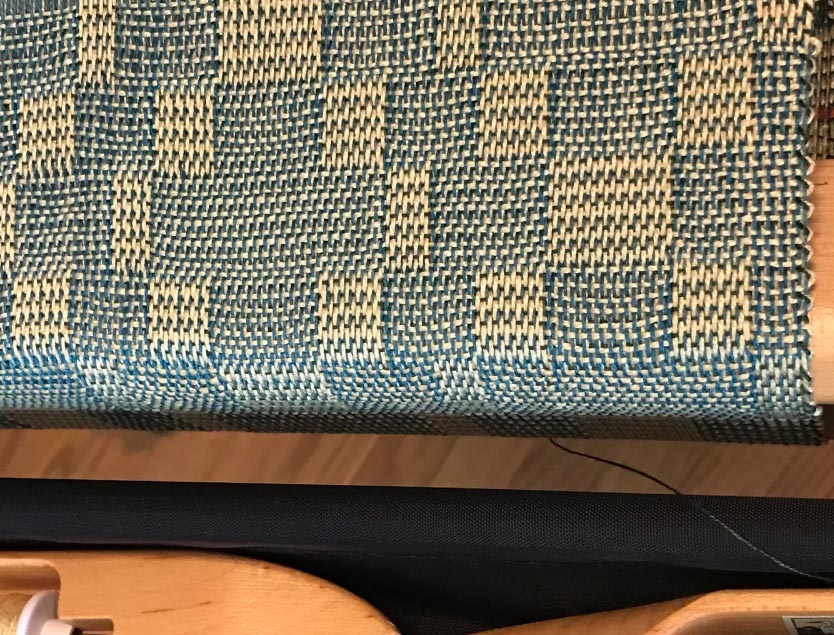
This is a solution from Karen Donde's workshop on how to control a second warp. This shows the second warp going over the raddle and weighted separately  in sections with water bottles.


Note - This article was written by Suzanne W. of Reno Fiber Guild.  The photos from the workshop will be posted in Part 2 on this blog.  You will read about how each weaver handled the two warps that were required to weave Turned Beiderwand and other turned tied weaves possible on the same threading in this workshop.  Warping was probably the most difficult aspect of the whole workshop.  TBW will be the abbreviation for Turned Beiderwand in this article.


Turned Beiderwand with Karen Donde was an excellent weaving workshop.  Karen taught us so much more than what the TBW structure is.  She taught and demonstrated how versatile the TBW threading was by altering either the tie-up and/or the treadling, we were able to weave a myriad of other structures.  Given the time and inclination, one could get lost in that rabbit hole in a very long time!    


Several things that I (Suzanne) especially liked about the workshop was:
We learned that TBW is a unit weave.  I love unit weaves for their design capabilities as you can hop to any block to create a design vs. following a prescribed progression to avoid exceedingly long floats in your warp.  Note: Since the BW draft is turned, all floats are in the warp.  


We learned to read and understand our drafts in relation to blocks.  With 8 shafts, you have 3 pattern blocks available.  Each pattern block requires two shafts.  The ground warp ends are threaded on shafts 1 and 2, leaving shafts 3-8 for pattern blocks.  Easy Peasy… keeping track of treadling and designing as its all “tied” to your blocks!  


We learned about Ratios and how to adjust them.  Yes, traditional TBW had long warp floats: but, we learned multiple ways to shorten those floats for a choice of purpose and fabrics.  Example with a 1:4 Ratio you’ll end up with a 9-end warp float, but the floats alternate between the two pattern shafts so that you have a tie-down (ground warp) every 5th pick.  Consequently, those long ends are densely set and staggered - not all hanging loosely to get snagged. As for a serviceable fabric, again that depends on your objective and the fibers used.  My ground warp is 20/2 Tencel and my pattern warp is 10/2 Tencel, both are sett at 30 epi.  With a 20/2 weft, my fabric has a very nice hand and is plenty stable for a scarf.  In short, ratio = # of tie-down threads to the number of pattern pics! 

 
Because this was a Zoom 3-Day Workshop vs. an in-person workshop, during our break on our last day we held a round-robin discussion about what looms we used, fiber, warping method, problems and tips.   Note:  Most of us with floor jack looms (raising shafts) had to weave everything upside down as more shafts were going up vs. staying down.  Those with Dobby or Sinking Shed looms were seeing the right-side of their fabric as they wove.  The rest of us didn’t see that front side until it was off the loom!  


Diane – 8-Shaft David with a sinking shed. She wove her fabric RIGHT side up! Fiber 20/2 ground Tencel and doubled 20/2 tencel for pattern.  Both warps wound unto back beam w/o any issue.  Pattern warp tension holding fine as of the last woven sample.  The consensus was that  sinking shed looms have less issue with displacing the tension on the pattern warp.

 
Joan – 8-Shaft David with a sinking shed & 2 back beams! Warps 10/2 and 5/2 and an exploration of color with yarns in stash!


Irene – Louet Spring w/2 back beams.  Warps 8/2 tencel and 10/2 cotton.  Had a mis-threaded section and thought she’d threaded wrong as was getting such long floats!  She cut off, fixed the mis-threading to start again.  Mystery problem w/loom when trying to advance warp. 


Kathy – AVL Home Loom with 2 back beams. 10/2 Cotton and 8/2 Tencel.  No problems to report!


Teddie – Baby Wolf 1 back beam with both warps wound unto back beam.  Had a minor issue with separating the two warps to put in a weighted dowel, but then okay.  10/2 Tencel and 8/2 Tencel.


Maggie – Baby Wolf 1 back beam.  Had tension issues at the start.  Stopped and re-tied on.  10/2 Cotton and 5/2 Cotton.


Karen – Aristat Leclerc/1 back beam. Didn’t report any tension issues.  10/2 ground and 8/2 cotton.  


Betsy – Baby Wolf 1 back beam.  Followed Karen’s video to the “T”! Her pattern warp was NOT wound unto the back beam but weighted in sections with S-hooks and filled water bottles.  No tension issues!   10/2 Cotton for both warps.


Sharlet – Fireside 2 back beams.  Because of the loom design, it was difficult to hang separate sets of lease sticks to see to thread!  10/2 cotton for both warps.  See Sharlet’s use of Kumi plastic bobbins for missing warp ends!  Holes in the bobbins make it easy to attach weights.


Shelley – Mighty Wolf 1 back beam.  Followed Karen’s video to the “T” and even left in the raddle on the back which helped with the tension of her pattern warp.  Note: The raddle was raised above the ground warp.  All was great!   10/2 and 5/2 yarns.  


Deb – Table Loom- 2 back beams.  10/2 cotton and 5/2 cotton.  No issue with tension.

  
Suzanne – Baby Wolf 1 back beam.  Wound both warps with 1/1 cross unto beam.  Separated warps with weighted dowel after 1st yard to keep tension on pattern warp.  The only pesky issue was advancing the warps once weighted.  To advance, I needed to un-weight, advance, and then re-weight.  But then the AVL double-back beam required getting up and down to adjust.  20/2 Tencel and 10/2 Tencel.  I will definitely have more JOY weaving future TBW’s on the AVL so that I can see the face of the fabric while weaving vs. the back!  


In the next blog post, you will see multiple versions of the following structures: Turned Biederwand, Turned Extended Summer & Winter, Turned Summer & Winter, Turned Even and Uneven Tied Overshot, Turned Half Dukagang, Turned Paired-Tie Weave, Doubleweaves, and lastly Double 2-Tie Units.  Everyone's 
favorite look for the contrast, texture and sharpness in the design was Turned Half Dukagang, but not the easiest to treadle  and is why the samples are so short!

 Keep in mind that everyone received a different draft and used recommend setts for yarns in their stash.  The overall favored structure for its durability was the summer and winters as it had the least floats and the cleanest lines.  Another favorite for its textural contrast and sharpness of design was the Turned Half Dukagang. Very pretty but not the quickest to treadle; hence, the shorter samples!   Photos, which will be shared in the next blog post, are from the group as they posted into Padlet.