Saturday, December 17, 2016

A Visit with Jochen Ditterich at Sage Weavers


 Sage Weavers was a week later than usual this month so that we could spend  time with Jochen Ditterich who was in town visiting his son.  Jochen has been teaching weaving for many years and was recognized this year by Handwoven as one of their two handweaving teachers of the year.


 Jochen showed us a rug he wove for his son when he received his PhD.  The technique he used is called shaft switching and it allowed him to get the involved pictorial image of his son bicycling.  Unfortunately, the dog made his mark on the rug - but otherwise it has stood the test of time well.

Jochen tells us he has many hundreds of pounds of wool in his studio and from the video show we watched, he wasn't exaggerating.  In order to weave the basketweave rug shown above, he combined several ends of slightly different colored yarn.  This gives the rug a much more interesting color effect than using just one color.


Here is an airy scarf woven in silk using bead leno as the weaving technique.  Note the nice little picot edging along the scarf.


Another sumptuous piece - this time a shawl woven in cashmere.

 
And, then on to Jochen's standby scarves - rayon chenille warp and weft.  No two are the same and there are usually many different warp colors in each scarf


A friend made this jacket using 8 of Jochen's chenille scarves.  A real luxury piece.

We enjoyed the afternoon talking and sharing with Jochen and hope that he will let us know when he is in Reno again so that we can get together again.  We had hoped he would be moving to Reno, but he tells us not now.  He has too many looms and too much yarn to move.   I guess most of us can identify with his dilemma.
 
Read more about Jochen here at his website and take a look at this video made by a friend of him in his home studio in Grand Rapids, MI.  https://youtu.be/lsVmPkKN1vQ

Tuesday, December 6, 2016

God Jul - a Scandinavian Holiday party.


Reno Fiber Guild had its annual Holiday Party this past Saturday.  The tradition is for members to bring a themed gift for the big basket (Scandinavia this year), sell raffle tickets for the basket and then the winner takes all.  This year's basket was overflowing and it looks like we may need to expand into two next year.


 We also have a pot luck (this year a Smörgåsbord). These photos were taken early on before most of the dishes had arrived.  It was really a "Groaning Board" with such a wide variety of foods that you could hardly try everything because there was so much. Included were some traditional Scandinavian foods like "Swedish Crescents" and a pickled herring appetizer, but it had been decided earlier that people could just bring their favorite dish to share without worrying about it being Scandinavian.


Beryl won the raffle for this year's basket and the bounty of gifts were passed around for everyone to inspect and appreciate.  The wonderful thing about having a theme for the basket each year is seeing how people interpret that theme.  Some gifts are handmade like the pillow, tote bag and scarf.  Some are there to inspire a new project (Swedish linen yarns).  There was a bookmark woven with a Swedish 4 shaft technique, Christmas ornaments knitted with traditional Scandinavian patterns, a woven wheat heart!  And then, there were the funny little trolls, Christmas ornaments of Scandinavian skiers, and lots of good things to eat.


 A couple of recipes were shared with the gifts - so they are being passed on as our special gift to you, our readers,  in this season of giving and sharing.  God Jul!

Swedish Crescents
1 cup salted butter
1/3 cup granulated sugar
1/2 tsp. almond extract
2/3 cup ground blanched almonds
1 2/3 cup flour
1 1/2 tsp. ground cardamom
1/4 cup powdered sugar

Oven 325°  Use mixer on med. to cream butter, sugar and extract for 1 minute.  On low, add ground almonds, flour and cardamom until soft and dough forms.  Roll dough into 1" balls & shape into crescents.  Place 1" apart on baking sheet.  Bake 14 to 16 min. or until set and lightly browned.  Let cool and sift powdered sugar over the cookies.

Swedish Pancakes
4 eggs
2 cups milk
1 cup flour
2 TBS sugar
1 dash salt
4 TBS butter

Place all ingredients except butter in blender.  Blend until combined, but don't over mix.  Let rest for 10 minutes.  Melt some butter in large skillet.  Pour 1/4 cup batter and cook.  Flip pancake when edges look like golden lace.  Cook a little longer until golden.  Top with jam or your favorite topping.


Thursday, November 10, 2016

November Meeting - Making Christmas Hearts

Because last year's Japanese textile studies were so interesting, this year the guild decided to try another area in the world known for their fine weaving and textile techniques.  Scandinavia and all it has to offer is our theme for this year. 

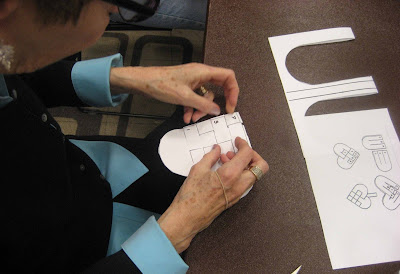
To kick things off, one of our members suggested weaving paper Christmas hearts which are found in all the Scandinavian countries at this time of year.  To prepare for the class, we bought the book by Susan Foulkes called Christmas Hearts.  The instructors, Gloria and Beryl tried their hand at the beginners projects and found that they were a bit tricky to get the construction paper to slip through all the contortions needed.  Gloria had a brilliant idea about making a lightweight pattern heart so that people could learn the technique before they made one with the stiffer paper and that seemed to be just what was needed to get everyone started.

Soon members were ready to get on with the more complicated two color hearts, including a six year old who seemed to be enjoying the process immensely.


These fun hearts are used in all kinds of decorating in Scandinavia and are often hung on the Christmas tree, filled with candy or other goodies.  Check out this collection in Pinterest for more designs and tutorials. 
 
One thing always leads to another and Karen found a link to making Scandinavian Christmas Stars out of quilting fabrics.  Something else to try this
holiday season.  
 
 God Jul from all of us at the Reno Fiber Guild.


Friday, October 7, 2016

Sashiko Workshop


The guild finished up their year long study of Japanese Textiles with a meeting workshop on Sashiko embroidery.The quilt shown above was made by Karen S.  The two purses were made by Mary N. 


Nisha K. shared this lovely placemat she made several years ago using the Sashiko stitching embellishment.


There was a good turn out of interested members.  Karen showed a couple of videos and shared some tips about the right and wrong ways to turn corners, etc. in Sashiko Stitching.  Everyone was given some practice cloth and thread to get started.


Kits had been purchased for participants with traditional Japanese designs, the correct embroidery thread and  Sashiko style needles.  Once people felt comfortable with the technique, they started in earnest on their kit fabric.


As you can see from this photo, everyone is totally engrossed in their stitching.  Plus, we will have many more hours of fun completing our projects.  Everyone is invited to come to the November meeting a bit early, to share their progress.

Thank you Karen and Mary for this introduction to Sashiko. 

Sunday, September 25, 2016

Hands On Weaving at the South Valleys Library

Members of the Reno Fiber Guild have caught the "weaving bug" and everyone seemed to get a big kick out of sharing it with the public at the South Valleys Library. In the photo below, Eva shows the young weaver the next treadle to push for her weaving pattern.
 This year we added Kumihimo Braiding to our "hands on" activities.  The public was introduced to this wonderful technique through both foam discs and also the traditional Japanese braiding stand called a Marudai.  Along with the actual experience of making braids, there were many examples of completed jewelry pieces and braids to examine. Karen watches closely to help smooth the path for this budding braider.


 We want very much for everyone to have a chance to make something wonderful.  Here Pati gives a very little student a helping hand.

 
Shelley watches as a new weaver checks out the Mountain Loom and learns how to operate the levers to change sheds.
 
 
The rigid heddle loom is an inexpensive place for many people to start a weaving journey.  Kathy is helping this woman experience the joy of weaving on one of these versatile gadgets.
 
Franco is new to the Reno area, but not new to weaving.  He likes to show people how they can weave without having to buy expensive equipment.  This loom is one he fashioned himself from dowels. The design is a work in progress, so stay tuned for more innovations. (photo by Franco)
 
Rachel is another weaver who uses simple tools to weave cloth.  She brought her backstrap loom on which she weaves cloth for clothing.    Although the loom is simple in design, it takes time and practice to learn backstrap weaving and Rachel learned her skills from indigenous teachers in Guatemala and Mexico. (photo by Franco)
 
Sarah brought her 8-shaft table loom to this year's event.  She is weaving a complex design with two colors of yarn in both warp and weft as Rachel and Anni admire the pattern.
Hands On events are a lot of fun - both for the public and for the guild members who volunteer their time, looms and materials. This post doesn't come close to showing all the people who made this day a success.  A big thank you to everyone who participated.  Also please visit Franco Rios' blog for additional photos

Sunday, September 4, 2016

Hands On Weaving and Demonstrations at the South Valleys Library


The Reno Fiber Guild has a long history with public weaving demonstrations.  In 1972, a couple of women had their looms at the Nevada State Fair and found that the public was so interested in what they were doing that they decided to form an organization devoted to spinning and weaving.  The result of their efforst was originally called Northern Nevada Spinners and Weavers Guild. Members found  so many interesting things to learn and do that involved fiber so eventually the guild changed its name to Reno Fiber Guild.  Today, the guild's main emphasis is weaving, although we are still interested in other fiber activities such as dyeing, braiding, beading and surface design on cloth.

On September 24th, Reno Fiber Guild partners with the South Valleys Library in Reno (15650A Wedge Parkway) to give the public a chance to try their hands at the ancient art/craft of weaving.  Between 11AM and 2PM  the whole family is invited to watch and participate in what we are doing.  The guild plans to have several looms for hands on weaving, an inkle loom, some rigid heddle looms and a couple of people demonstrating on a Japanese braiding stand called a Marudai. Plus there may be a few more surprises like a backstrap weaver who learned her skills in Mexico.

For our young at heart group (that would be kids of all ages) we will have a cardboard loom kit and helpers to demonstrate how easy it is to weave a small tapestry piece. Your woven piece and any materials left in the kit will be yours to keep. 

There will be an exhibit of handwoven items and several knowledgeable weavers who will be able to explain processes and answer your questions.

Please join us to learn more about weaving and experience the thrill of making cloth appear on the loom.


Saturday, July 23, 2016

Woven Shibori Workshop

Our Woven Shibori Workshop was originally scheduled in March and was to be preliminary  to our dye day in May where we would dye our woven shibori pieces.  But we found that Kathrin Weber was going to be close by so we enjoyed a workshop with her and postponed our shibori workshop until today.  Normally the guild doesn't have events in the summer, but it was nice to break with tradition and try our hands at something new. 

Workshop weavers had warped their looms in advance with a cellulosic fiber of some sort.  We watched a bit of Diane Totten's video on Crimp Cloth and then set about to weave our own, using drafts provided in the Catharine Ellis book, Woven Shibori.

Since there was polyester available, several people selected some for weft and will steam their pieces for permanent pleats.  In the photo below, the warp is green cotton and the weft is polyester in a brownish green.  The shibori pulling threads are on the white bobbin.  Karen wove the sample shown here, changing the number of picks of ground cloth between shibori pull threads.  It will be interesting to see how this will affect the pattern.  There are several choices for this cloth.  It can be dyed and/or steamed for a permanently pleated fabric.


Lorene chose a diamond pattern for her shibori pulling threads - see the photo below.  She purposely chose a thicker pulling thread so that there may be small holes left after she has finished her piece which will add an interesting dimension to her cloth.  She intends to paint her piece with dye once she is finished weaving and the threads have been pulled.


Susan decided to use a polyester weft which will give her permanent pleats. Her pulling threads are close together which means there will be lots crimps here in the finished cloth.  Here again, she could also apply dye, if she chooses because her warp is cotton and will accept fiber reactive dyes.

  
We had several guild members drop by to show examples of woven shibori that they had woven and dyed in the past.  Virginia brought a piece of multishaft cloth that she had woven and was busy pulling the threads in preparation for dye work.


12/6/16  Here is an update with several photos to show how the projects turned out.  The blue scarf was woven and dyed by Nancy S.  She used instant indigo and was pleased with the gentle patterning which will go perfectly with blue jeans.
 The scarf below was woven by Sue M.  She used a polyester weft for part of the scarf (the pink section) and then dyed her piece with fiber reactive dyes and steamed it.
  
There was a demonstration warp on Beryl's Wolf Pup at the class of mercerized green cotton.  The weft was a beige/green polyester.  This is a photo of the resulting scarf - dyed with fiber reactive dyes and steamed to permanently pleat the material.

Thursday, June 9, 2016

Learning to Weave - Days Two and Three


In our Learn to Weave classes there is nothing that lifts the instructor's spirits more than seeing a smile like this one.  Eva has gone through the long process of winding a warp, dressing the loom and is finally making cloth.
 
In the photos below, you see each new weaver at varying stages of the process.  Each of them has their own mentor to keep things progressing in the right direction.  It's this one-on-one attention that makes our classes special and successful.


We couldn't resist this last photo of LTW instructor, Jen.  I suspect she is doing tie ups on one of the looms and still manages a cheery smile.  Weavers are a strange lot - they love crawling under looms if it means they can get a new pattern underway.
 
 
A big thank you to all of the instructors/mentors for this year's program.  RFG is looking forward to seeing all of our new student/members in the months to come.

Sunday, May 22, 2016

Third Annual Learning to Weave Class


Saturday saw the beginning of a new class of weavers that enrolled in the Learn to Weave program that the Reno Guild offers once a year. The class starts off the new weavers with tutorials in warping on a warping board.   Each student has a mentor from the guild with them during the process.  In a couple of weeks, this same group will be back for further instruction on the fine art of warping and weaving off their sampler.  The class uses Issue 13 of Weaver's Craft which includes instructions for a four shaft sampler (direct tie up) and lots of good information on designing your own towels.  
 
We wish our new weavers the very best of luck in their journey to become proficient at the warping and weaving process.  The skills learned in this class will serve them well in their weaving future.  We also want to thank our volunteers who put together the class structure and are there to give support to their students.
Suzanne and Jen have put many hours into setting up this yearly class. 


And now - something new for many of us.  At the class, Jen introduced what she called the H Knot.  A means of affixing your new warp yarn to the warping board.  Looks interesting and something to try out.  Thanks, Jen!